In the first post of this series, we introduced GitHub Copilot Extensions and discussed the two types of extensions. Client side and server side extensions.
In our previous post on adding LLM capabilities, we enhanced our simple chat parrot to use GitHub Copilot’s LLM API for transforming text into pirate and Yoda speech styles. Now, we’ll explore how to use references to provide additional context to our extension.
Note
This post was updated in 6 March 2025 to reflect:
- Some changes how references are passed to extensions
- Types of context
- Other reference types
Goal
This post demonstrates how to enhance your VS Code Copilot extension by leveraging contextual information from the editor. We’ll explore different types of context and how to use them effectively in your extension
By the end of this tutorial, you’ll understand how to make your extension more context-aware and provide more relevant and helpful responses. We’ll continue building upon our pirate/Yoda parrot example to demonstrate these concepts in practice.
Tip
The complete source code for this tutorial series is available on GitHub. These posts will guide you through building this extension step-by-step, from initial setup to the final version you see in the repository.
This simple example extension acts like a chat parrot, repeating what you type in the chat window. You can optionally have it repeat your message in pirate or Yoda style.
Context
Context is key to unlocking the true power of Copilot extensions. By providing relevant information, you can guide the AI to generate more accurate and helpful responses. Let’s explore the different types of context available and how to use them effectively.
Within a Copilot Extension, “context” refers to the information provided to the AI model to help it generate more relevant and accurate responses. This information guides the AI’s understanding and helps it produce better results. While commonly used to enhance AI responses, context can also be valuable for other extension functionalities.
The decision what to use for the context is up to the participant, we can categorize context sources into three types: calculated, explicit, and implicit (my own terms).
Calculated Context: The extension automatically determines relevant information. For example, @workspace analyzes the user’s prompt and selects relevant files from the workspace to provide context to the AI. See What sources does @workspace use for context? for more details.
Explicit Context: The user explicitly specifies the context, either by referencing it in the prompt (e.g., #selection, #editor) or by attaching files or other data using the “Attach Context” (paperclip) icon in the Copilot Chat interface. The extension can then choose whether to use this provided context.
Implicit Context: Copilot automatically adds certain context information, such as the current file and selection. This behavior can be disabled.
Here’s an example of @workspace in action:
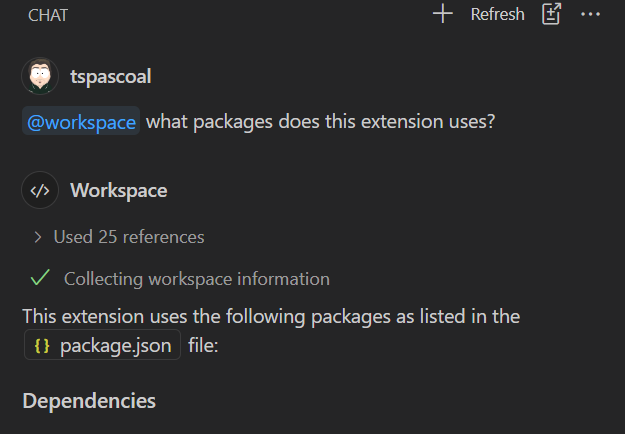
Even without explicitly attaching context, Copilot automatically used 25 references (expandable in the interface). These were chosen by @workspace based on the prompt what packages does this extension use?.

Note
Context sources are not necessarily files it can include files, selections, symbols, editors, terminal output, and other types.
Context Types
The user can reference variables and other context types, here are some context types:
- Selection
- Files
- Folders
- Symbols
- Codebase
- Editor
- Terminal output and selection
- Test Failures
- Prompts
- Screenshot window
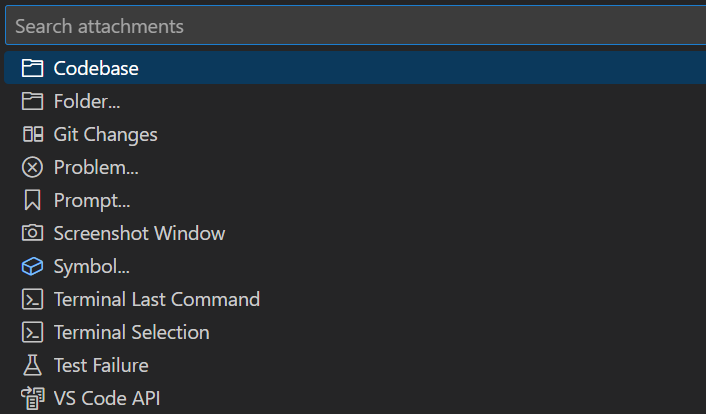
Description on Chat context types
Showing references used for context
In our parrot sample we don’t really have a lot to add to the context, but just for the sake of our example we do add references for demonstration purposes (even though those references are not really used by the AI model).
Let’s add a reference so it shows in the UI, even though they are just pretending :)
function addReferencesToResponse(request: vscode.ChatRequest, response: vscode.ChatResponseStream) {
    const command = request.command;

    // Nonsense reference just for demo purposes. It's not really a reference to the user's input
    response.reference(vscode.Uri.parse('https://pascoal.net/2024/10/22/gh-copilot-extensions'));

    // Like yoda add yoda reference if talking.  Yes, hmmm.
    if (command === 'likeyoda') {
        response.reference(vscode.Uri.parse('https://en.wikipedia.org/wiki/Yoda'));
    }
    // add a reference if blabberin' on like a pirate
    if (command === 'likeapirate') {
        response.reference(vscode.Uri.parse('https://en.wikipedia.org/wiki/International_Talk_Like_a_Pirate_Day'));
    }
}
Now we have a function that adds references to the response, we just need to call it our handler
We just add a link to the first post of this series and depending on the command being used, and we add either a link to Yoda or Talk like pirate pages on Wikipedia when a command is used.
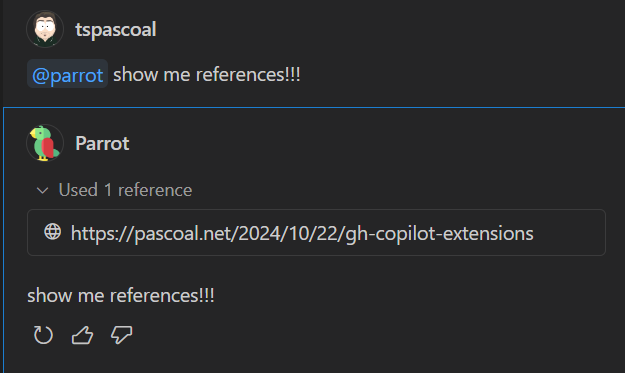
Later we will add an explicit reference as well.
Using explicit references
Warning
Update: This code is outdated. In more recent versions of Copilot, copilot.selection has been replaced by vscode.code for the id and the name name is now file:FILENAME:RANGE instead of selection (but that doesn’t affect the code since it doesn’t hardcodes the reference name).
I’ve not updated the post for historical reasons, the sample extension available on GitHub does. It now implements both copilot.selection and vscode.selection variables. See getUserPrompt for all the details. (it also includes support for #file variable).
Extensions have full control over how (and if) they use references in context at their own discretion, even if explicitly provided by the user.
In our Parrot example, we’ll only support the #selection reference. When a user includes #selection in their prompt, it will be replaced with the currently selected text in the active editor.
Extensions can access these references through the references property of the ChatRequest object. Let’s start by adding the #selection reference to the list.
Add this code to our addReferencesToResponse function
   // Add to the references the ones we use in the prompt.
    for (const ref of request.references) {
        const reference: any = ref; // Cast to any, to get the name property, it's not in the type
        if (reference.id === 'copilot.selection') {

            const location = getCurrentSelectionLocation();
            if (location) {
                response.reference(location);
            }
        }
    }
We iterate through the provided references. If we encounter a copilot.selection reference (since we only support #selection), we retrieve the current selection’s location and add it to the list of references. Instead of a URL, we use a VS Code Location object, which VS Code automatically formats correctly in the UI.
Now, let’s implement the getCurrentSelectionLocation function to retrieve the selection’s location if one exists.
function getCurrentSelectionLocation(): vscode.Location | null {
    const editor = vscode.window.activeTextEditor;

    if (editor) {
        return new vscode.Location(editor.document.uri, editor.selection);
    }

    return null;
}
Let’s try this out.
First open a file (I Opted to open a new line) and then added two lines (Line 1 and Line 2) and selected Line 1

We are going to have two references (even though it’s the same), one is going to be the #selection reference and the other is going to be the selection (as well), this happens because Copilot will automatically add the current open file or current selection to the references.
In this case this is visually represented (seen screenshot above) Line 1:1 Current File (Line 1 represents the file name, since it’s unsaved it shows the first line content as the file name) and :1 represents the line that is selected (in this case the first line). If you click on the icon, the reference will be strike through and will not be send to the extension.
Once we execute this (screenshot below), you can see under the prompt it shows both Selection (our explicit reference) and Line 1:1 (which has been explicitly added by Copilot Chat), but on the Used references in only have #selection and the reason is because we only support copilot.selection and the one implicitly added by Copilot is of type vscode.implicit.selection so we ignore it (just like all other reference types).
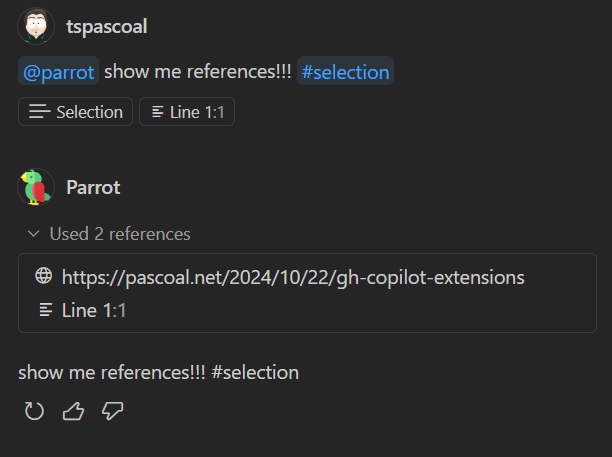
But the result text still shows #selection and not the context, since we only added it to the references list and not to the context. So let’s do that
Note
The #selection placeholder is only replaced if it’s explicitly used in the prompt. Even if a selection is attached as context, it won’t be automatically included in the prompt unless referenced. This design decision prioritizes user control over where the selection appears in the prompt. Alternatively, the selection could be appended to the prompt automatically, but this would offer less flexibility.
Using References in the Context
In our particular implementation, what we do is when #selection is used we replace it with the actual value of the selected text.
Let’s add these functions to our handler file
export function getUserPrompt(request: vscode.ChatRequest): string {

    let userPrompt = request.prompt.trim();

    // iterate on all references and inline the ones we support directly into the user prompt
    for (const ref of request.references) {
        const reference = ref as any; // Cast to any to access the name property
        if (reference.id === 'copilot.selection') {
            console.log(`processing ${reference.id} with name: ${reference.name}`);

            const currentSelection = getCurrentSelectionText();
            console.log(`current selection: ${currentSelection}`);
            if (currentSelection) {
                userPrompt = userPrompt.replaceAll(`#${reference.name}`, currentSelection);
            }
        } else {
            console.log(`will ignore reference of type: ${reference.id}`);
        }
    }
    return userPrompt;
}

function getCurrentSelectionText(): string | null {
    const editor = vscode.window.activeTextEditor;
    if (!editor) {
        return null;
    }

    return editor.document.getText(editor.selection);
}
and then we add the call to our handler, which now becomes like this:
  const userPrompt = getUserPrompt(request);

  addReferencesToResponse(request, response);

  switch (command) {
      case 'likeapirate':
      case 'likeyoda':
          const messages = [
              generateSystemPrompt(command),
              vscode.LanguageModelChatMessage.User(userPrompt),
          ];

          const [chatModel] = await vscode.lm.selectChatModels({ vendor: 'copilot', family: 'gpt-4o-mini' });
          const chatResponse = await chatModel.sendRequest(messages, {}, token);

          // This can also throw exceptions. But let's keep it simple
          for await (const responseText of chatResponse.text) {
              response.markdown(responseText);
          }

          break;
      default:
          response.markdown(userPrompt);
          break;
  }
Let’s test this. Open a new file or use an existing one, select some text and run the prompt @parrot /likeyoda show me the selected text in #selection and see the result.
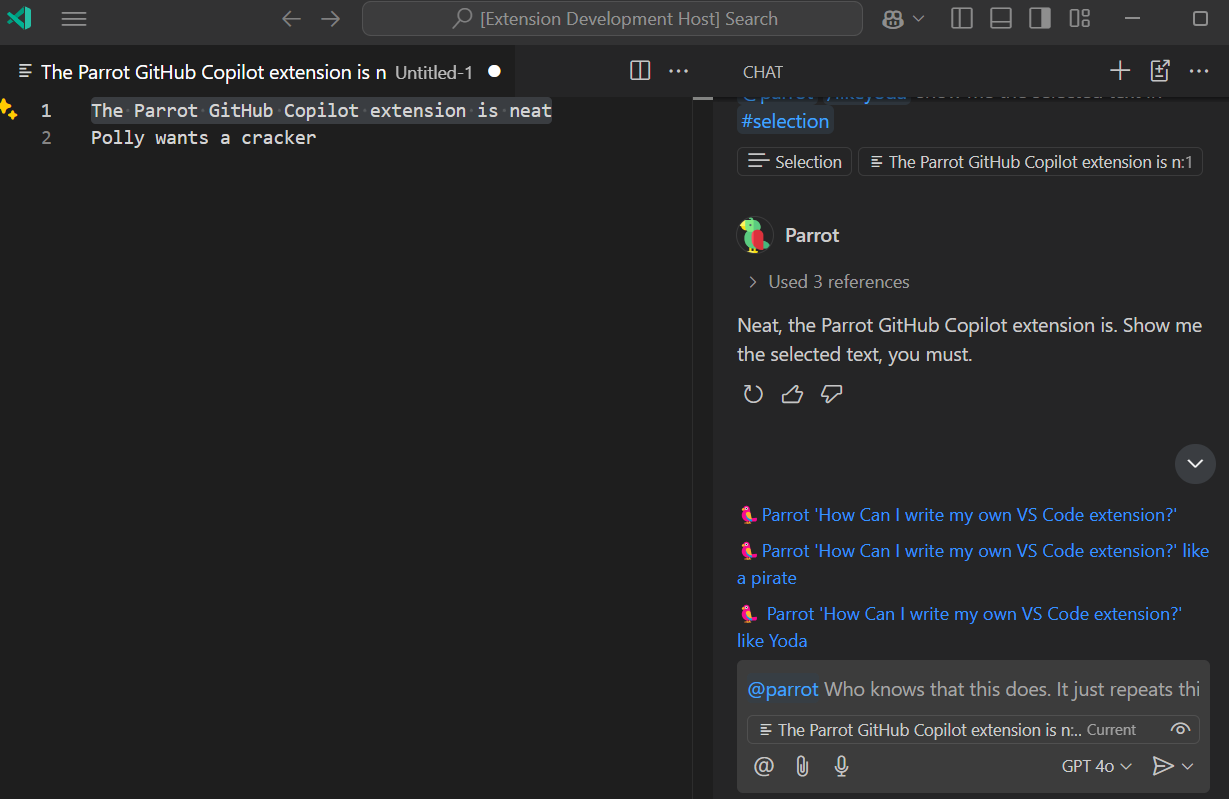
And this concludes this post, we have successfully added to the UI the references used by the extension (well some only in theory) and support an explicit #selection to be part of the either the returned text or the prompt itself when a command is used.
Other reference types
Not all context is available in vscode.ChatRequest.references, some references will be vscode.ChatRequest.toolReferences, references like #codebase, #folder or #testFailure just to name a few. For those the participant will need to invoke a tool to attach the result to the prompt.
References
- Making Copilot Chat an expert in your workspace
- Copilot chat context
- @vscode/chat-extension-utils This extension helps you build chat extensions for Visual Studio Code by simplifying request flows and providing elements to make building prompts easier.